Hello Again,
A few days ago Lucy over at Attic 24 revealed her newest WIP and I think everyone fell in love. She found some great photos and a pattern for a japanese flower shawl/shrug. There was only one problem for me... the pattern was in French. For those of you who know me personally, you may remember I did take a year of French as an undergraduate college student, however... I could only translate the last part "bravo!" and that part was mostly because my elementary school music teacher, Mr. Lady, used to tell say "Bravo!" whenever we would do a nice job playing our instruments.
So, I really didn't think I could wait for someone to post an English version of this, many people on flickr and Lucy's comments section have provided additional pattern links but still in French, or at least not in English. This evening, I had some time to try to translate the diagram here into the flower. AND I think I did it!
Go to the link and look at the diagram. From looking at Lucy's photo and other crocheter's flowers the first three rows are pretty easy to make out.
To start: Ch 6 and slip st to make a circle
Row 1: ch 3 (counts as first dc), 11 dc into the circle = 12 dc (1 is the chain 3), slip st to connect
Row 2: ch 3 (counts as first dc), *ch 2, dc into the chain space and ch 2*, *repeat for each chain space = 12 dc total (1 is the ch 3 and 11 dc)
Row 3: add new color in a chain space and ch 3(counts as first dc), 3 dc in the chain space, *ch1, 4 dc in chain space*, * repeat into each chain space = you will have 12 groups of 4 dc's around the circle
Here is where it gets tricky. Note: this may not be what the pattern really should be, but this is what I did and I think it looks like it works.
Row 4: Start your new color in the chain space. Slip st until you get to the second stitch of a group of 4 dc. Ch 5 and slip st into the third dc stitch. Continue to slip st until you get to the next group of 4 dc's. So you are going to slip st around the entire circle and making a chain loop at the second and third stitch (the middle) of each group of 4 dc's.
Finishing Row 4: Once you have gone all around the circle you will do a single crochet connecting the 4th row to the third row (connect by the chain in between two dc clusters).
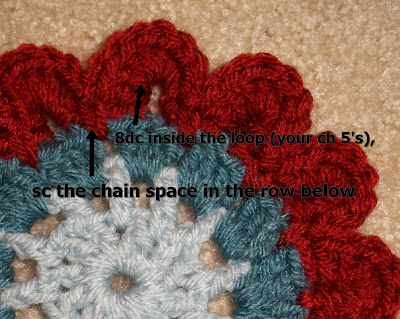
Then do 8 dcs inside the chain 5 space you made. *Sc connecting to the row below, then go directly to the next chain five to make the next petal with 8dc*, repeat until all of the chain 5 spaces are full petals. End with the final sc to the chain space in the row below and slip st and fasten off!
I hope this helps others who could not translate from French to English. I was just telling one of my students earlier this week that my next thing on my "After the dissertation to-do list" is to learn some more French, and these great "French only" patterns provide another incentive! Isn't it funny how these things all come together?
XOXO SH


Hello, nice flower! It looks the same as mine but I did it differently from round three. Round three is where I did the 5 chain loop (where the double/treble - US/British terms go to form the petals). In round three there are 12 groups of single/double crochet. There are in groups of 4 in every space from the previous row. So, this is what I did; single/double crochet 1, single/double crochet 1 but then chain 5 straight after. Then single/double crochet the last two stitches of that group of four (the first of them secures those 5 chains making the loop). Do the same in every empty space right the way around and you will have 12 loops as well as a round of groups of 4 single/double crochet. In the final round you do eight double/treble crochet into each loop - securing each one with a single/double crochet in between the groups of 4 doubles/trebles from the previous row.
ReplyDeleteI have to say it looks pretty similar to yours - I think there are several ways people have been doing it. Who knows which way it says to do it in the original Japanese pattern. I am happy with my flower my way and yours looks the same your way - you take your pick!
You explained how to made the flower so well. Thank you so much.
ReplyDeleteI've seen them all over blogland and have been longing to make one of these flowers.
ReplyDeleteI'm so happy to have found your explanation.
Sadly, the diagram has disappeared but maybe, just maybe I can do this with the help of your pictures
Thank you!
Margaret